DJI Mic 3 Ultimate Combo (4 TX + 1 RX + Charging Case)
The DJI Mic 3 Ultimate Combo has been assembled by Ferntech to provide the complete four-transmitter setup for maximum recording flexibility, ensuring you're equipped for any professional recording scenario. It includes:
DJI Mic 3 (2 TX + 1 RX + Charging Case) × 1
DJI Mic 3 Transmitter × 2
Small, Lightweight, Versatile
The DJI Mic 3 Transmitter is compact, lightweight, and discreet. It supports both magnetic and clip-on attachment methods. The detachable, rotatable clip allows you to flexibly adjust the microphone angle, whether clipped sideways or inverted, ensuring optimal audio capture in any scenario.
All-In-One, Ready To Go
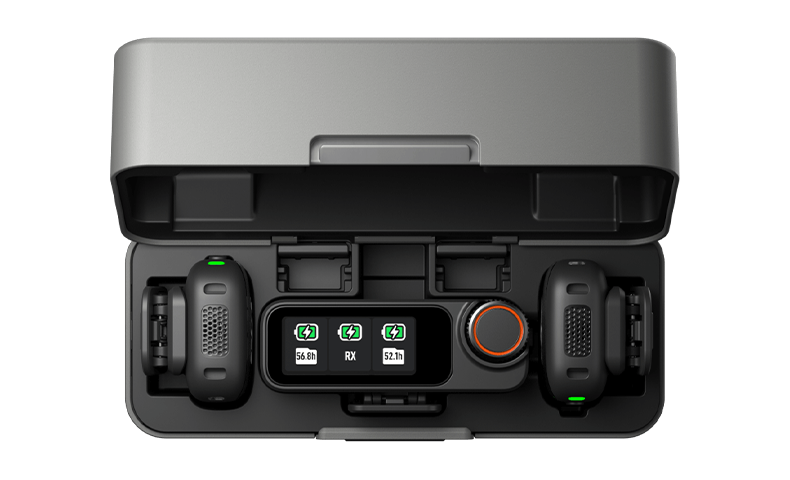
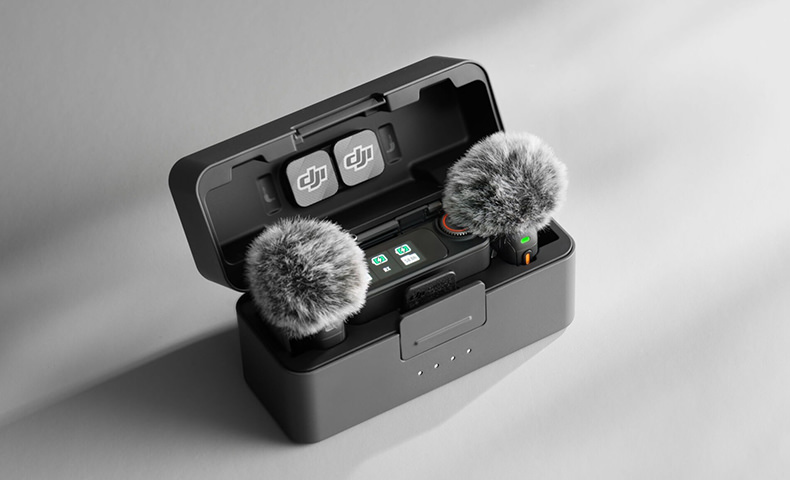
The charging case neatly holds two transmitters and one receiver. Each transmitter fits inside with the windscreen and either the magnet or magnetic clip attached—no need to remove them. When the transmitters are stored with the clips attached, the lid also has space for the magnets and locking audio adapter cable [1], so everything stays organized and ready to go.
Premium Audio, Smarter Experience
Adaptive Gain Control for Balanced Volume [3]
Automatic - Automatic mode effectively prevents audio clipping, making it ideal for outdoor environments with dramatic volume fluctuations, such as sporting events.
Dynamic - Dynamic mode automatically adjusts gain in response to volume changes, ensuring consistent loudness—ideal for quiet indoor settings like studios.
Three Voice Tone Presets To Match Your Style [4]
Regular - Regular is the default setting, offering clean, natural, and balanced audio.
Rich - Rich puts extra emphasis on the lows for a fuller, more powerful sound.
Bright - Bright highlights the highs, giving your voice extra clarity and sparkle.
Two-Level Noise Cancelling for Focused Sound [5]
Basic - The Basic level is ideal for quiet indoor settings, reducing fan, air conditioning, and reverb noises while preserving vocal clarity.
Strong - The Strong level excels in noisy environments, significantly cutting ambient noise for clearer vocals.
With the windscreen attached, the transmitter effectively reduces wind noise and other unwanted noise, delivering crisp, clear audio even in windy conditions or noisy environments—ideal for live streaming, vlogging, and more.
Effortless Control, Smooth Operation
On-Receiver Parameter Adjustment - The receiver features a 1.1-inch AMOLED touchscreen and a dial, putting gain, battery status, and modes at your fingertips. Adjust settings quickly and enjoy flexible, efficient operation.
App-Based Control & Firmware Updates - Use the DJI Mimo app to fine-tune settings and update firmware directly from your phone. Enjoy quick, convenient parameter adjustments and effortless upgrades.
Robust Performance, Endless Possibilities
4 TX + 8 RX for Seamless Collaboration [2]
DJI Mic 3's receiver can connect with up to four transmitters at once, letting you capture four audio sources simultaneously. The main receiver can also sync audio to up to seven additional receivers. Whether it's a group interview or a multi-camera production, you'll get crystal-clear audio on every device, making post-production a breeze.
Flexible, Versatile Channel Settings
The receiver lets you choose between Mono and Stereo (dual-channel) modes—output audio from each transmitter separately, or merge them into a single track to suit any creative scenario.
Four-Channel Output [2], Effortless Editing
When set to Quadraphonic mode, the DJI Mic 3 Receiver—paired with select Sony cameras or computer software—supports independent output of four audio tracks. This enables precise track separation and flexible mixing, giving you greater creative freedom in post-production.
Dual-Band Reliability, Rock-Solid Transmission
DJI Mic 3 supports automatic frequency hopping between 2.4 GHz and 5 GHz bands [6], with a transmission range of up to 400 meters [7]. Its robust anti-interference capabilities ensure stable audio transmission, even in complex wireless environments like trade shows.
Lossless Transmission, Pristine Audio
With Lossless Audio enabled [8], the transmitter delivers uncompressed 48kHz 24-bit audio directly to the receiver. This ensures every recording is captured in stunning, high-fidelity detail.
Dual-File 32-bit Float Internal Recording
Internal Recording
Never worry about lost audio—internal recording protects your material from wireless interference or device failures. With dual-file internal recording, DJI Mic 3 saves both the original track and an algorithm-enhanced version at once [9], streamlining your workflow and keeping your creative process smooth.
32-bit Float Internal Recording
With support for 32-bit float internal recording, DJI Mic 3 provides a high dynamic range that not only delivers high-quality recording but also adapts better to complex sound environments. It excels in capturing every nuance of a voice, from quiet whispers to booming decibel levels, providing greater reliability in erratic noise scenarios and more flexibility in post-production.
Built-in Timecode for Precise Sync
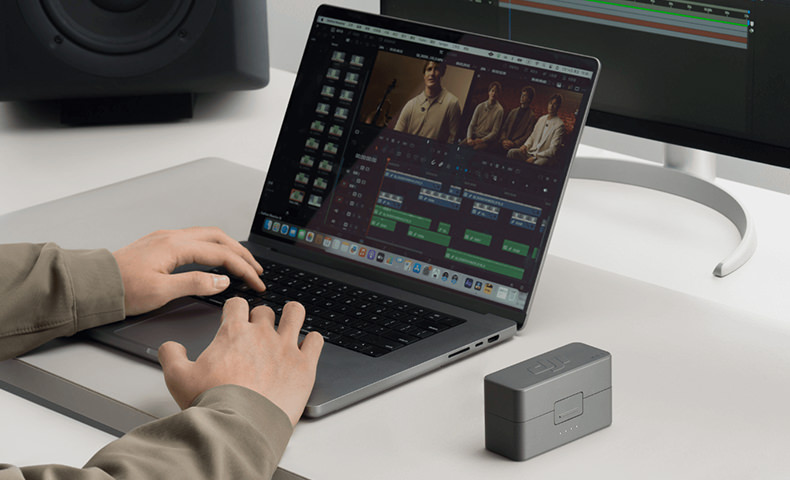
DJI Mic 3 offers high-precision timecode support [10], with the transmitter embedding timecode data during internal recording and the receiver supporting both timecode input and output. With less than one frame of drift over 24 hours [11], you can instantly align multi-camera footage in post-production, making editing faster and more efficient.
Hassle-Free File Export
When you're done shooting, simply use the charging case and USB-C data cable to connect both transmitters to your computer or smartphone [12]. Instantly transfer all your internally recorded files in one go—editing and sharing couldn't be easier.
All-Day Power, Worry-Free Creation
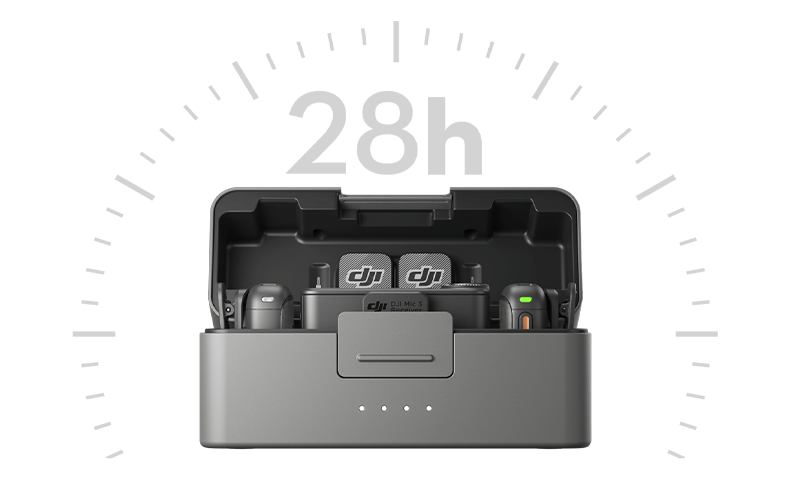
28-Hour Extended Battery Life [13]
A transmitter lasts up to 8 hours [14], and a receiver up to 10 hours [14]. A fully charged charging case provides about 2.4 full charges to achieve a total of 28 hours of extended use [13]. Easily handle long video shoots and live streams without worrying about running out of power.
5-Minute Quick Charge
Charge for just 5 minutes and get up to 2 hours of use [15] from the transmitter and receiver—ideal for a quick power boost. With 3C fast charging support, a full charge takes only about 50 minutes [16], so you can get back to creating in no time.
Multiple Intelligent Power-Saving Features
Auto Power-Saving [17] - The transmitter automatically enters sleep mode when it doesn't detect a signal from the receiver. It will wake up and reconnect to the receiver once the signal is detected again. This feature allows you to wear the transmitter for extended periods without needing to frequently power it on and off.
Auto Power-Off - On the receiver screen, or in the DJI Mimo app, you can set the transmitter and receiver to automatically power off after a period of inactivity. When this feature is enabled on both devices, they will automatically shut down if not connected for more than 15 minutes, preventing battery drain and preserving more power for your creativity.
Auto On/Off With Camera - After enabling the Auto On/Off With Camera feature on the receiver screen or in the DJI Mimo app, the receiver, when connected to the camera via the 3.5mm audio cable or hot shoe, will automatically turn on when the camera is turned on and turn off when the camera is turned off.
Use While Charging - When the receiver is connected to your smartphone via cable, it draws power directly from your phone. If you connect an external power source to the receiver's USB-C port, you can charge both the receiver and your phone simultaneously—so you can keep recording without interruption [18].
Connect Instantly, Create Freely
DJI OsmoAudio™ Direct Connection - The transmitter supports direct connection to Osmo Action 5 Pro, Osmo Action 4, or Osmo Pocket 3 without a receiver [19]. The DJI OsmoAudio™ connection ecosystem delivers premium audio, simplifying your gear and workflow for a more efficient creative process.
Wide Device Compatibility - The receiver offers multiple ports to meet your creative needs: a locking 3.5mm TRS output port for stable, interruption-free connections; a 3.5mm TRRS monitoring port for real-time audio monitoring; and a USB-C port for simultaneous charging and recording—ideal for phones, tablets, or computers. With the adapters, you can quickly adapt to different devices for a more efficient and flexible workflow.
Bluetooth Direct-To-Phone [20] - No receiver required—the transmitter connects directly to your smartphone via Bluetooth, so you can easily use it with your favorite third-party recording or live streaming apps [21]. With the DJI Mimo app, you can adjust settings and update firmware all in one place, making setup and operation quick and effortless.
Notes
* All of the above data was collected in a controlled environment. Actual experience may vary. For usage settings and suggestions, refer to the official DJI product page.
- When storing accessories in the charging case, avoid stacking to prevent receiver screen damage.
- To achieve the 4TX + 8RX setup or four-channel output, additional accessories must be purchased separately. The four-channel output feature is only supported by certain Sony camera models (requiring the DJI Mic Series Camera Adapter) and certain computer software (via USB output). For details, refer to the compatibility list on the Downloads page of the official DJI Mic 3 website.
- The Adaptive Gain Control feature can be configured via the receiver or the DJI Mimo app, and it is turned off by default.
- The Voice Tone Preset modes can be selected via the receiver or the DJI Mimo app, with the default set to Regular.
- The Noise Cancelling feature is turned off by default but can be activated and set to either Strong or Basic level through the receiver, DJI Mimo app, or device directly connected via the OsmoAudio™ ecosystem. When using the receiver with multiple transmitters, you can adjust the noise cancelling settings for each transmitter individually or for all transmitters simultaneously. When an Osmo Action 5 Pro, Osmo Action 4, or Osmo Pocket 3 is connected directly via OsmoAudio™, settings can be adjusted on the product interface. When the transmitter is directly connected to a smartphone, the settings can be adjusted within the Mimo app.
- Operating frequency allowed varies among countries and regions. Refer to local laws and regulations for more information.
- Measured using DJI Mic 3 (2 TX + 1 RX + Charging Case), with Lossless Audio off, in an open, unobstructed environment free of interference.
- When Lossless Audio is enabled, the transmitter's battery life will decrease by approximately 2 hours under nominal operating conditions, and the maximum transmission range will be reduced by approximately 50%.
- Algorithm-based enhancements include voice tone presets, low cut, noise cancellation, and adaptive gain control.
- For details on supported timecode modes, frame rates, and timecode output formats, refer to the FAQ page on the official DJI Mic 3 website.
- Measured using DJI Mic 3 (2 TX + 1 RX + Charging Case) in an environment free of electromagnetic interference, with continuous power supplied to the transmitters and receiver following timecode synchronization and throughout 24 hours of continuous recording.
- For a list of compatible devices, refer to the Downloads page on the official DJI Mic 3 website.
- Measured using DJI Mic 3 (2 TX + 1 RX + Charging Case) paired with a fully charged charging case, with features such as noise cancellation and internal recording off, during close-range audio recording under interference-free conditions, with both transmitters connected to the receiver and the receiver connected to a camera via the 3.5mm audio cable.
- Measured using DJI Mic 3 (2 TX + 1 RX + Charging Case), with features such as noise cancellation and internal recording off, during close-range audio recording under interference-free conditions, with both transmitters connected to the receiver and the receiver connected to a camera via the 3.5mm audio cable.
- Measured in a controlled environment with the transmitters and receiver battery levels below 25%, using a charger of 5V output, with noise cancellation off, during close-range audio recording under interference-free conditions, with both transmitters connected to the receiver, and the receiver connected to a camera via the 3.5mm audio cable.
- Data was collected in a controlled environment and should be taken as reference only.
- This feature is only effective when the device is powered on. If the auto power-off feature for the transmitter and receiver is enabled in the DJI Mimo app or on the receiver screen, both devices will automatically shut down if no pairing signal is detected after 15 minutes.
- If your phone uses a Lightning interface, the receiver cannot be powered by the phone's battery without an external power source. To enable simultaneous charging and use, you need to purchase the DJI Mic 3 Mobile Phone Adapter (Lightning) separately.
- Some features of DJI Mic 3 cannot be configured through the device directly connected via the OsmoAudio™ ecosystem. For details, refer to the FAQ page on the official DJI Mic 3 website.
- Only one transmitter can be directly connected and used as the audio input source at a time.
- When connected directly to a smartphone via Bluetooth, the transmitter does not support audio recording with the phone's native camera app; it only works with third-party apps. For a list of compatible apps, refer to the Downloads page on the DJI Mic 3 official website.
Product Specifications
DJI Mic 3 Transmitter
Model: DMT03
Dimensions: 28.77×28.34×16.35 mm (L×W×H) (with magnet)
Weight: 16 g (with magnet)
Wireless Mode: Wi-Fi: 802.11 a/b/g/n/ac/ax
SDR: Customizable
Equivalent Isotropic Radiated Power (EIRP): Wi-Fi:
2.400-2.4835 GHz: < 20 dBm (FCC/CE/SRRC/MIC)
5.725-5.850 GHz: < 20 dBm (FCC/SRRC), < 14 dBm (CE)
SDR:
2.400-2.4835 GHz: < 20 dBm (FCC/CE/SRRC/MIC)
5.150-5.250 GHz: < 20 dBm (FCC/CE/SRRC/MIC)
5.250-5.350 GHz: < 20 dBm (FCC/CE/SRRC/MIC)
5.470-5.725 GHz: < 20 dBm (FCC/CE/MIC)
5.725-5.850 GHz: < 20 dBm (FCC/SRRC), < 14 dBm (CE)
Operating frequency allowed varies among countries and regions. Refer to local laws and regulations for more information.
Wireless Mode Operating Frequency: Wi-Fi:
2.400-2.4835 GHz
5.725-5.850 GHz
SDR:
2.400-2.4835 GHz
5.150-5.250 GHz
5.250-5.350 GHz
5.470-5.725 GHz
5.725-5.850 GHz
Operating frequency allowed varies among countries and regions. Refer to local laws and regulations for more information.
Bluetooth Protocol: Bluetooth 5.4
Bluetooth Operating Frequency: 2.400-2.4835 GHz
Bluetooth Transmitter Power (EIRP): BLE: < 10 dBm
BR/EDR: < 20 dBm
Operating frequency allowed varies among countries and regions. Refer to local laws and regulations for more information.
Battery Type: Li-ion
Battery Capacity: 137 mAh
Battery Energy: 0.531 Wh
Battery Voltage: 3.87 V
Charging Specification: Max 5 V
Charging Temperature: 5° to 45° C (41° to 113° F)
Operating Temperature: -10° to 45° C (14° to 113° F)
Charging Time: Approx. 50 minutes
Operating Time: 8 hours
Measured using DJI Mic 3 (2 TX + 1 RX + Charging Case), with features such as noise cancellation and internal recording off, during close-range audio recording under interference-free conditions, with both transmitters connected to the receiver and the receiver connected to a camera via the 3.5mm audio cable.
Internal Recording Available Duration: 24-bit (single file): 57.3 hours
24-bit (dual file): 28.6 hours
32-bit float (single file): 43.0 hours
32-bit float (dual file): 21.5 hours
DJI Mic 3 Receiver
Model: DMR03
Dimensions: 53.85×28.69×22.00 mm (L×W×H)
Weight: 25.1 g
Wireless Mode: Wi-Fi: 802.11 a/b/g/n/ac/ax
SDR: Customizable
Equivalent Isotropic Radiated Power (EIRP): Wi-Fi:
2.400-2.4835 GHz: < 20 dBm (FCC/CE/SRRC/MIC)
5.725-5.850 GHz: < 20 dBm (FCC/SRRC), < 14 dBm (CE)
SDR:
2.400-2.4835 GHz: < 20 dBm (FCC/CE/SRRC/MIC)
5.150-5.250 GHz: < 20 dBm (FCC/CE/SRRC/MIC)
5.250-5.350 GHz: < 20 dBm (FCC/CE/SRRC/MIC)
5.470-5.725 GHz: < 20 dBm (FCC/CE/MIC)
5.725-5.850 GHz: < 20 dBm (FCC/SRRC), < 14 dBm (CE)
Operating frequency allowed varies among countries and regions. Refer to local laws and regulations for more information.
Operating Frequency: Wi-Fi:
2.400-2.4835 GHz
5.725-5.850 GHz
SDR:
2.400-2.4835 GHz
5.150-5.250 GHz
5.250-5.350 GHz
5.470-5.725 GHz
5.725-5.850 GHz
Operating frequency allowed varies among countries and regions. Refer to local laws and regulations for more information.
Bluetooth Protocol: Bluetooth 5.4
Bluetooth Operating Frequency: 2.400-2.4835 GHz
Bluetooth Transmitter Power (EIRP): BLE: < 10 dBm
Battery Type: Li-ion
Battery Capacity: 275 mAh
Battery Energy: 1.065 Wh
Battery Voltage: 3.87 V
Charging Specification: Max 5 V
Charging Temperature: 5° to 45° C (41° to 113° F)
Operating Temperature: -10° to 45° C (14° to 113° F)
Charging Time: Approx. 50 minutes
Operating Time: 10 hours
Measured using DJI Mic 3 (2 TX + 1 RX + Charging Case), with features such as noise cancellation and internal recording off, during close-range audio recording under interference-free conditions, with both transmitters connected to the receiver and the receiver connected to a camera via the 3.5mm audio cable.
DJI Mic 3 Charging Case
Model: DMC03
Dimensions: 106.30×42.50×59.20 mm (L×W×H)
Weight: 164.1 g (charging case only)
Battery Type: Li-ion
Battery Capacity: 1950 mAh
Battery Energy: 7.55 Wh
Battery Voltage: 3.87 V
Charging Specification: Max 5 V, 1.5-2 A
Charging Temperature: 5° to 40° C (41° to 104° F)
Operating Temperature: 5° to 45° C (41° to 113° F)
Charging Time: Approx. 1.5 hours
Charging Cycles for TX and RX: When charging two transmitters and one receiver simultaneously, a fully charged charging case can fully charge them for approx. 2.4 times.
General
Polar Pattern: Omnidirectional
Frequency Response: Low Cut Off: 20 Hz-20 kHz (encoded)
Low Cut Off: 20 Hz-24 kHz (lossless)
Low Cut On: 100 Hz-20 kHz (encoded)
Low Cut On: 100 Hz-20 kHz (lossless)
Microphone Sensitivity: Microphone Capsule: -36±1 dBV@1 kHz, 94 dB SPL
Signal-to-Noise Ratio (SNR): 72 dB
Maximum Sound Pressure Level (SPL): 126 dB SPL@1% THD
130 dB SPL@10% THD
Sampling Frequency: 48 kHz
Bit Depth: 32-bit float/24-bit (switchable)
Max Input Level (3.5 mm): -
Equivalent Noise: 22 dBA
Monitor Interface Output Power: Max Output Power: 20 mW@1 kHz, 32 Ω
Max Transmission Distance:
400 m
Measured using DJI Mic 3 (2 TX + 1 RX + Charging Case), with Lossless Audio off, in an open, unobstructed environment free of interference.
80 m
Measured using DJI Mic 3 (2 TX + 1 RX + Charging Case) in a laboratory-simulated high-interference environment, with no packet loss and clear, high-fidelity audio.
Supported Frame Rate: 23.98F, 24F, 25F, 29.97F, 29.97DF, 30F, 50F, 60F
Offset: 0.5 ppm, deviation less than 1 frame within 24 hours*
* Measured using DJI Mic 3 (2 TX + 1 RX + Charging Case) in an environment free of electromagnetic interference, with continuous power supplied to the transmitters and receiver following timecode synchronization and throughout 24 hours of continuous recording.
Input: LTC
Input Port: 3.5mm TRS
Input Voltage: Not greater than +6 dBu
Output: LTC, Audio-TC
Output Port: 3.5mm TRS, USB-C
Output Voltage: 0.5 Vp-p
In the box
Core Components
DJI Mic 3 Receiver × 1
DJI Mic 3 Transmitter × 4
DJI Mic 3 Charging Case × 1
Cases & Cables
DJI Mic 3 Carrying Pouch × 1
DJI Mic 3 Compact Carrying Pouch × 2
DJI Mic 3 Mobile Phone Adapter (USB-C) × 1
DJI Mic 3 Locking Audio Adapter Cable (3.5mm TRS) × 1
DJI Mic 3 Transmitter Magnetic Charging Cable × 2
USB-C to USB-C Data Cable × 1
Accessories
DJI Mic 3 Windscreen (Black/Gray) × 4
DJI Mic 3 Windscreen (Black) × 4
DJI Mic 3 Magnetic Clip × 4
DJI Mic 3 Magnet × 4
WHY BUY FROM US?
By buying from Ferntech, you'll have the confidence that you are dealing directly with New Zealand's leading drone experts. Our staff are knowledgable drone pilots who offer expert advice, trusted support and superior specialist service. Only through us will you receive a full New Zealand warranty, phone and email support, and access to our certified Repairs Centre with DJI-qualified drone technicians. And we guarantee that we will have the best prices on the market — if not let us know and we will match any price (conditions apply).
Warranty Details
1 year warranty
DJI Mic 3
What can I use DJI Mic 3 with?
You can use DJI Mic 3 with a range of devices, including cameras, smartphones (via USB-C/Lightning port or direct Bluetooth connection), and computers.
DJI Mic 3 supports DJI OsmoAudio™connection ecosystem. The transmitter supports direct Bluetooth connection to Osmo 360, Osmo Action 5 Pro, Osmo Action 4, or Osmo Pocket 3 without a receiver, delivering premium audio and simplifying your gear and workflow.
For a complete list of compatible devices, refer to the Mobile Phone & Tablet Compatibility List and OsmoAudio™Compability List available on the Downloads page of the official DJI Mic 3 webpage.
What are the differences between different DJI Mic 3 combos? How should I choose?
DJI Mic 3 (2 TX + 1 RX) includes a charging case, one receiver, and two transmitters, suitable for two-person audio recording, and providing extended battery life.
DJI Mic 3 (1 TX + 1 RX) includes one receiver and one transmitter, suitable for single-person audio recording of individual creators.
The DJI Mic 3 Transmitter can be used with mobile phones, Osmo 360, Osmo Action 5 Pro, Osmo Action 4, or Osmo Pocket 3. Additionally, the DJI Mic 3 Transmitter is compatible with other DJI Mic 3 combos, allowing multiple transmitters and receivers to be used together.
The DJI Mic 3 Receiver is compatible with other DJI Mic 3 combos, allowing multiple transmitters and receivers to be used together. It can also be used independently as a timecode generator.
Do I need to activate DJI Mic 3?
No. DJI Mic 3 is ready to use without activation. You can scan the QR code on the package to register for a one-year warranty extension.
How do I update the firmware of the DJI Mic 3 transmitters and receiver?
1. Connect the DJI Mic 3 Receiver to a phone either via a phone adapter (USB-C or Lightning) or directly to the DJI Mimo app, and update the firmware for the receiver in the DJI Mimo app. After placing the receiver in the charging case, you can also update the firmware for the transmitters and the charging case.
2. A DJI Mic 3 Transmitter can also connect directly to the DJI Mimo app to complete its firmware update.
The DJI Mic 3 Mobile Phone Adapter (Lightning) is sold separately.
How do I link the DJI Mic 3's transmitters with the receiver?
The transmitters and receiver in the same combo are already linked by default. If you need to link them again, you can do so in the following ways:
Method 1: Put the transmitters and receiver into the charging case and they will link automatically.
Method 2: Power on the transmitters and receiver, swipe down on the receiver's main screen to enter the Settings, then swipe left to choose Device Linking. Add TX by selecting the desired TX slot. Press and hold the Linking Button on one transmitter, and follow the on-screen instructions to complete linking. When the System Status LED on the transmitter blinks green and blue alternately, it indicates that linking is in progress. When the LED turns solid green, the linking is complete.
To end linking during the process, tap Cancel.
How many recording modes does DJI Mic 3 provide?
DJI Mic 3 has three recording modes: M (Mono), S (Stereo), and Q (Quadraphonic).
1. M (Mono Mode): Under Mono mode, the audio recorded by all transmitters will be combined in one channel.
2. S (Stereo Mode): Audio from the two transmitters is recorded via separate channels. When there are more than two transmitters, TX1 and TX3 are combined to form the left channel output, while TX2 and TX4 are combined to form the right channel output.
3. Q (Quadraphonic Mode): Audio from the four transmitters is recorded via separate channels.
For detailed compatibility information on Quadraphonic mode, refer to the DJI Mic Series Camera Adapter Compatibility List and the Quadraphonic Computer Software Compatibility List on the Downloads page of the official DJI Mic 3 website.
What functions does the DJI Mic 3 Charging Case provide?
The DJI Mic 3 Charging Case can be used for linking the transmitters with the receiver, as well as storing the transmitters, receiver, mobile phone adapters (USB-C or Lightning), locking audio adapter cable, windscreen, magnet, and magnetic clip. When fully charged, it can charge two transmitters and one receiver approx. 2.4 times.
The DJI Mic 3 Mobile Phone Adapter (Lightning) is sold separately.
Are the DJI Mic 3's USB-C and Lightning adapters interchangeable with the mobile phone adapters of DJI Mic, DJI Mic 2, DJI Mic Mini, and DJI Pocket 2?
No.
Are the DJI Mic 3's transmitters and receiver compatible with those of DJI Mic, DJI Mic 2, and DJI Mic Mini?
No.
What is the maximum transmission distance between DJI Mic 3's transmitters and the receiver?
400 m*
* Measured using DJI Mic 3 (2 TX + 1 RX + Charging Case), with Lossless Audio off, in an open, unobstructed environment free of interference.
Additionally, the estimated transmission distances in other typical scenarios are as follows (for reference only):
The estimated transmission distance for 2 TX + multiple RX, with Lossless Audio off, in an open, unobstructed environment free of interference, is 400 m.
The estimated transmission distance for 4 TX + multiple RX, with Lossless Audio off, in an open, unobstructed environment free of interference, is 200 m.
The estimated transmission distance for 2 TX + multiple RX, with Lossless Audio on, in an open, unobstructed environment free of interference, is 200 m.
The estimated transmission distance for 4 TX + multiple RX, with Lossless Audio on, in an open, unobstructed environment free of interference, is 100 m.
How long does it take to fully charge the transmitters and receiver using the DJI Mic 3 Charging Case? How long does it take to fully charge the charging case separately?
It is recommended to use a 5V/2A charger to charge DJI Mic 3 transmitters, the receiver, and the charging case.
The DJI Mic 3 transmitters and receiver both support fast charging. When using the DJI Mic 3 Charging Case, both the transmitters and receiver can be charged to 80% in just 18 minutes*. The transmitters can also be charged via the DJI Mic 3 Transmitter Magnetic Charging Cable, reaching 80% in 18 minutes* as well.
At room temperature, it takes approximately 50 minutes* to fully charge the transmitters and the receiver using the charging case. It takes about 1.5 hours* to fully charge the charging case separately.
* Measured in a controlled test environment and is for reference only.
How do I enable noise cancellation on DJI Mic 3? How to adjust the noise cancellation levels?
You can enable or disable noise cancellation by double-pressing the Power Button on the DJI Mic 3 Transmitter once.
When joining a group, users recording with the DJI Mic 3 Receiver can swipe up on the receiver's main screen to access the settings. From there, you can adjust the noise cancellation levels (Strong or Basic) for all connected transmitters, or tap on a transmitter icon to set its noise cancellation level separately.
When recording with a phone, you can adjust the noise cancellation levels (Strong or Basic) using the DJI Mimo app.
When an Osmo 360, Osmo Action 5 Pro, Osmo Action 4, or Osmo Pocket 3 is connected directly via OsmoAudio™, settings can be adjusted on the product interface.
What are the updates of DJI Mic 3 compared to DJI Mic 2 and DJI Mic Mini?
For more details, refer to the comparison page of the DJI Mic series on the official website.
Does DJI Mic 3 support automatic power-saving and shutdown after inactivity?
The DJI Mic 3 Transmitter supports Auto Power-Saving, which is effective only when the transmitter is powered on. The transmitter automatically enters sleep mode when it doesn't detect signal from the receiver. It will wake up and reconnect to the receiver once the signal is detected again.
DJI Mic 3 supports Auto Power-Off after inactivity, which needs to be set in advance for both the receiver and transmitters via the DJI Mimo app. The automatic shutdown time is set to 15 minutes. The operation logic is as follows:
1. When the feature is enabled on both the receiver and transmitters: If no signal is detected, the transmitters will enter power-saving mode without shutting down, and the receiver will remain powered on. After 15 minutes, both will automatically shut down.
2. The feature is enabled on the receiver, and off on the transmitters: If no signal is detected, the transmitters will enter power-saving mode without shutting down, and the receiver will remain powered on. After 15 minutes, the receiver will automatically shut down, while the transmitters continue power-saving without shutting down.
3. When the feature is enabled on the transmitters, and off on the receiver: If no signal is detected, the transmitters will enter power-saving mode without shutting down, and the receiver will remain powered on. After 15 minutes, the transmitters will automatically shut down, while the receiver remains powered on.
4. The feature is disabled on both the receiver and transmitters: Only the transmitters will enter power-saving mode, and neither will automatically shut down.
DJI Mic 3 Magnetic Clip/Magnet
What is the magnetic force of the DJI Mic 3 Magnetic Clip/Magnet?
10 N.
DJI Mic 3 uses single-pole magnetization and can attract iron blocks weighing up to 1.0 kg.
Will the DJI Mic 3 Magnetic Clip/Magnet affect my bank cards?
All magnetic products contain magnets. It is recommended to keep the DJI Mic 3 Magnetic Clip/Magnet away from bank cards, pacemakers, RAM chips, and hard discs.
What should I be aware of when using the DJI Mic 3 Magnetic Clip/Magnet?
1. DO NOT use when wearing heavy clothes (sweaters, down jackets, etc.). The transmitters could fall off due to lack of magnetism.
2. Use with caution during vigorous exercise, for example, jumping, sprinting, etc.
DJI Mic 3 Transmitter
Where can I mount the DJI Mic 3 Transmitter?
The DJI Mic 3 Transmitter can be mounted on collars, lapels, hat brims, and more using the magnetic clip. The magnetic clip allows for attachment in four directions (up, down, left, or right) for optimal audio capture. The transmitter can also be attached to other parts of your clothing using the magnet, such as the middle of soft clothing, to prevent it from sagging. Additionally, the transmitter has a built-in magnet, so it can be attached to metal objects as needed for recording.
How do DJI Mic 3 transmitters receive audio signals? Is the polar pattern directional or omnidirectional?
Omnidirectional.
How many operating modes do DJI Mic 3 transmitters support?
1. Transmitters connect to a receiver via 2.4GHz/5GHz frequency band.
2. Direct Bluetooth connection to smartphone.
3. Direct connection to certain DJI products via DJI OsmoAudio™.
Operating frequency allowed varies among countries and regions. Refer to local laws and regulations for more information.
When the transmitter is connected to a mobile phone via Bluetooth, does it support audio recording for livestreaming? How do I connect the transmitter to a mobile phone via Bluetooth? What features are supported?
1. It depends on the compatibility of the livestreaming app and the mobile phone operating system. You can test it with Bluetooth earphones or headsets. If you cannot record audio with the earphones or headset for livestreaming, the transmitter does not support this function when connecting to a mobile phone via Bluetooth. Some phone models may not support stereo-mode livestreaming; please verify through actual use. For software compatibility information, refer to the Third-Party App Compatibility List on the Downloads page of the official DJI Mic 3 webpage.
2. To connect, power on the transmitter. Press and hold the Linking Button for two seconds and the mobile phone will automatically search for available Bluetooth devices. Select DJI Mic 3 TX when it appears and tap to complete linking. When the transmitter's status indicator turns solid blue, the linking is completed. If the mobile phone's Bluetooth cannot find DJI Mic 3, reboot Bluetooth on the mobile phone and link again.
3. When the transmitter is connected directly to your phone via Bluetooth, it supports voice tone presets, gain control, noise cancellation, mute, low cut, 32-bit float internal recording, dual-file internal recording, and adaptive gain control. These features must be enabled through the DJI Mimo app or the receiver. Noise cancellation and internal recording can be turned on or off using the transmitter's power button.
What devices can the DJI Mic 3 Transmitter connect to wirelessly? How many transmitters can these devices connect to simultaneously?
Each DJI Mic 3 Transmitter can connect to up to eight DJI Mic 3 receivers, while each DJI Mic 3 Receiver can connect to up to four transmitters.
DJI Mic 3 supports DJI OsmoAudio™connection ecosystem. The DJI Mic 3 transmitters can directly connect to certain DJI products, namely one transmitter for Osmo Action 4, and up to two transmitters for Osmo 360, Osmo Pocket 3, and Osmo Action 5 Pro. For devices that support connection with two transmitters, you can match any two products from Mic 2, Mic Mini, and Mic 3 for simultaneous use.
The DJI Mic 3 transmitters can directly connect to your smartphone via Bluetooth, but a phone only connects to one transmitter at a time.
How to set up Adaptive Gain Control?
DJI Mic 3 supports Adaptive Gain Control, which can be set through the receiver, DJI Mimo app, or DJI OsmoAudio™devices. This feature is off by default. Once enabled, you can choose between Automatic and Dynamic modes.
Automatic Mode (Clipping Prevention): Ideal for environments with dramatic volume fluctuations. It smoothly handles volume fluctuations and suppresses sudden spikes, ensuring balanced and consistent audio output. For example, during interviews at a sports event, you might encounter sudden sounds like engine noise or a starting pistol.
Dynamic Mode (Volume Balancing): It automatically adjusts the audio output's dynamic range based on changes in input levels, compensating for input that is too low or too high by increasing or decreasing the gain as needed, ideal for quiet indoor settings like studios.
Once Adaptive Gain Control is enabled, gain adjustment on the receiver is not supported.
When the DJI transmitters are directly connected to certain DJI OsmoAudio™devices, the above two modes will not be active, only the built-in clipping prevention function of specific devices will take effect. For details, refer to the OsmoAudio™Compability List on the Downloads page of the official DJI Mic 3 webpage.
What is the internal storage of the DJI Mic 3 transmitters? Do the transmitters support external SD cards for storage?
The DJI Mic 3 transmitters have built-in 32GB storage and do not support external storage. The recording duration under different conditions is as follows:
24-bit (Single File): 57.3 hours
24-bit (Dual File): 28.6 hours
32-bit Float (Single File): 43.0 hours
32-bit Float (Dual File): 21.5 hours
What is the format of the audio files internally recorded by the DJI Mic 3 Transmitter? How can I export audio files from a transmitter?
During internal recording, a file is saved every 30 minutes. The 24-bit and 32-bit float recordings are both saved in WAV format.
You can export recorded files in two ways:
Wired Connection: Connect the transmitter to a computer using the DJI Mic 3 Transmitter Magnetic Charging Cable, or place the transmitter in the charging case and connect it to a computer with the included data cable.
App Download: Connect the transmitter to the DJI Mimo app and use the File Download feature to export recorded audio files.
What are the Original File and Edited File in File Format?
The DJI Mic 3 Transmitter's internal recording supports simultaneous recording of both original and edited files, which can be selected in Transmitter Settings>File Format.
The Original File is the raw audio captured by the transmitter, with filenames ending in "orig". The Edited File is the audio that has been enhanced using algorithms such as voice tone presets, low cut, noise cancellation, and adaptive gain control, with filenames ending in "edit".
What is the naming rule for internal recording files on the DJI Mic 3 Transmitter?
Take the recording folder "TX_MIC001_20250530_115001" as an example:
TX: Indicates that this folder is for internal recordings of the transmitter.
MIC001: Indicates this is the first internal recording folder for the transmitter. A new folder is created every 50 files.
20250530_115001: Shows the date and time when the folder was created.
Take the recording file "TX01_MIC002_20250527_202904_orig.wav" as an example:
TX01: Indicates the serial number of the current transmitter, which is assigned by the receiver based on the pairing order. This serial number will change if the transmitter is re-paired.
After pairing, the transmitter serial number in the internal recording files will follow the most recent pairing order, regardless of whether the transmitter is currently connected to the receiver.
If the transmitter is removed from the receiver while connected, its serial number in the internal recording files will be reset to TX00.
If you purchase a single transmitter, the transmitter serial number in the internal recording files will be TX00.
When the transmitter is connected to a smartphone or OsmoAudio™ device, the transmitter serial number in the internal recording files will always be TX00.
MIC002: Indicates this is the second recording file from the current transmitter. New recordings are numbered sequentially.
When connected to a receiver or OsmoAudio™device, the date and time are synchronized with the connected device. When using the transmitter alone, you can sync the date and time with your phone via the DJI Mimo app.
orig: Means the audio is the original, unprocessed recording from the transmitter. If it says "edit," it means the audio has been processed by an algorithm.
How do I delete audio files from a DJI Mic 3 Transmitter?
The recorded audio can be exported or deleted after connecting the transmitter to a computer. If formatting is needed, it can also be done through the receiver or the DJI Mimo app.
When the storage space of the DJI Mic 3 transmitters runs out and Loop Recording is enabled, the oldest recording will be automatically overwritten.
DJI Mic 3 Receiver
How many transmitters can the DJI Mic 3 Receiver link with?
It can link with up to four DJI Mic 3 transmitters at once.
Can the DJI Mic 3 Receiver transmit audio data to devices with XLR input ports?
No.
How do I monitor audio during recording with DJI Mic 3? Can I adjust monitoring volume?
To monitor audio, first link the DJI Mic 3 Receiver with the transmitters, then plug the 3.5mm earphone jack into the 3.5mm Monitor Port of the DJI Mic Receiver. To adjust the monitoring volume, swipe down on the main screen of the DJI Mic 3 Receiver and go to Receiver Settings>Volume>Monitor Select to select which transmitter's audio to monitor, and adjust the monitoring volume as needed at Monitor Volume.
Can I lock the screen of the DJI Mic 3 Receiver? If so, how?
Yes. You can lock the receiver screen by pressing and holding the dial for two seconds. The screen will prompt Screen Locked. To unlock, press and hold the dial again. You can also lock the Timecode interface.
When the DJI Mic 3 Receiver is connected to a mobile phone, can I play back recorded audio on the mobile phone?
You can playback audio on the mobile phone without removing the receiver.
Can DJI Mic 3 charge both the phone and the receiver simultaneously?
Yes. When the DJI Mic 3 Receiver is connected to your phone via mobile phone adapter, you can use a charging cable to charge both the mobile phone and the receiver through the receiver's USB-C port.
Does the DJI Mic 3 Receiver output digital or analog signals?
The DJI Mic 3 Receiver's Output Port outputs analog signals for camera connections.
The DJI Mic 3 Receiver's USB-C Port, Mobile Phone Adapter (USB-C or Lightning), and hot shoe output digital signals.
What is DJI Mic 3's Auto On/Off With Camera? How do I use it?
When the DJI Mic 3 Receiver is connected to a camera via 3.5mm TRS cable or hot shoe, you can enable this function and the receiver automatically powers on and off in sync with the camera.
How to use Quadraphonic mode? How is the audio distributed?
In Receiver Settings, you can set the channel mode to Q (Quadraphonic). In this mode, the audio from the four transmitters is transmitted independently through four channels without being merged. To use the Quadraphonic mode, connect the DJI Mic 3 Receiver to a Sony camera's MI hot shoe using the DJI Mic Series Camera Adapter, or connect it to a computer via USB.
Please note that in Quadraphonic mode, the audio output from the 3.5mm Output Port remains stereo: TX1 and TX3 are combined as the left channel, while TX2 and TX4 are combined as the right channel.
For detailed compatibility information on Quadraphonic mode, refer to the Quadraphonic Computer Software Compatibility List available on the Downloads page of the official DJI Mic 3 website.
What is Lossless Audio? In what scenarios is it recommended?
With Lossless Audio enabled, the transmitter delivers uncompressed 48kHz 24-bit audio directly to the receiver, preserving better sound quality.
Ideal for recording scenarios that require high audio quality, such as high-fidelity vocal recording and musical instrument performances.
Because Lossless Audio uses a higher bitrate, it may reduce the effective transmission range. For best results, we recommend using it in environments with minimal wireless interference and when the transmitter and receiver are close to each other.
What are the Indoors mode and Outdoors mode? In what scenarios are they recommended?
Both modes support automatic frequency hopping between 2.4GHz and 5GHz bands. The difference lies in the operating frequency covered by the two modes in different environments.
The Indoors mode covers a wider frequency range and offers stronger anti-interference performance. However, due to the laws and regulations in some countries or regions, certain 5GHz frequency bands can only be used indoors. Please select the appropriate mode based on your local laws and regulations, as well as your actual indoor or outdoor environment. In countries or regions where there are no restrictions on the use of 5GHz bands, you may use the Indoors mode by default, provided it complies with local laws and regulations.
Group Linking and Control
How to distinguish between the host receiver and the secondary receivers in a group?
DJI Mic 3 supports group linking, which allows multiple transmitters and receivers to work together. In a multi-receiver network, the receiver that creates the group is designated as the host receiver (displayed as Host on the screen), while receivers that join the group are designated as secondary receivers (displayed as Sec on the screen). Only the host receiver can pair with and control the transmitters. Secondary receivers do not have this capability. Please ensure that all transmitters are disconnected before joining the group.
How to achieve the 4TX + 8RX setup?
Please refer to the following steps:
1. To Achieve the 4TX + 1RX Setup With the Charging Case: Place the receiver and two transmitters into the charging case. Wait until the receiver's screen displays the status of the two transmitters, then remove them from the case. Next, place the other two transmitters into the charging case with the receiver. Once the receiver's screen shows the status of these two transmitters, remove both transmitters and the receiver from the case.
To Manually Link 4 TX + 1 RX: Power on both the transmitters and the receiver. On the receiver's main screen, swipe down to enter the settings. Select Device Linking and then add TX. Tap the unconnected transmitter slot to start the linking process. Press and hold the Linking Button on the transmitter until its System Status LED blinks green and blue alternately. Repeat this process for each of the four transmitters.
2. To Link Eight Receivers: Use the receiver that has already been linked with the transmitters as the host receiver. On its main screen, swipe down to enter the settings, select Device Linking and then add RX. For the other receivers, which will act as secondary receivers, swipe down on the main screen to access the settings and select Device Linking to join a group. When the authentication code appears on the touchscreen, tap Confirm to authorize the secondary receivers to join the group. Add seven secondary receivers in sequence to achieve the 4TX + 8RX setup.
Before joining a group with a secondary receiver, ensure that it has disconnected from all transmitters.
After joining a group, will placing the transmitters or receiver into the charging case automatically disconnect them?
When the transmitters or receiver are placed in the charging case, they will automatically shut down, but the linking information will be retained.
What functions does the transmitter support in individual and group control modes? How do I use them?
When the receiver connects to two or more transmitters, you can adjust them together as a group. To access this feature, swipe up on the main screen of the host receiver, or select the status bar using the dial, and then double-click the dial to enter the group control page. On the group control page, you can adjust the transmitters' internal recording and noise cancellation settings.
On the receiver's main screen, select a transmitter by tapping on the touchscreen or using the dial, and then double-click the dial to enter the individual control page for that transmitter. There, you can mute or unmute the transmitter, and adjust its internal recording, noise cancellation, and voice tone settings.
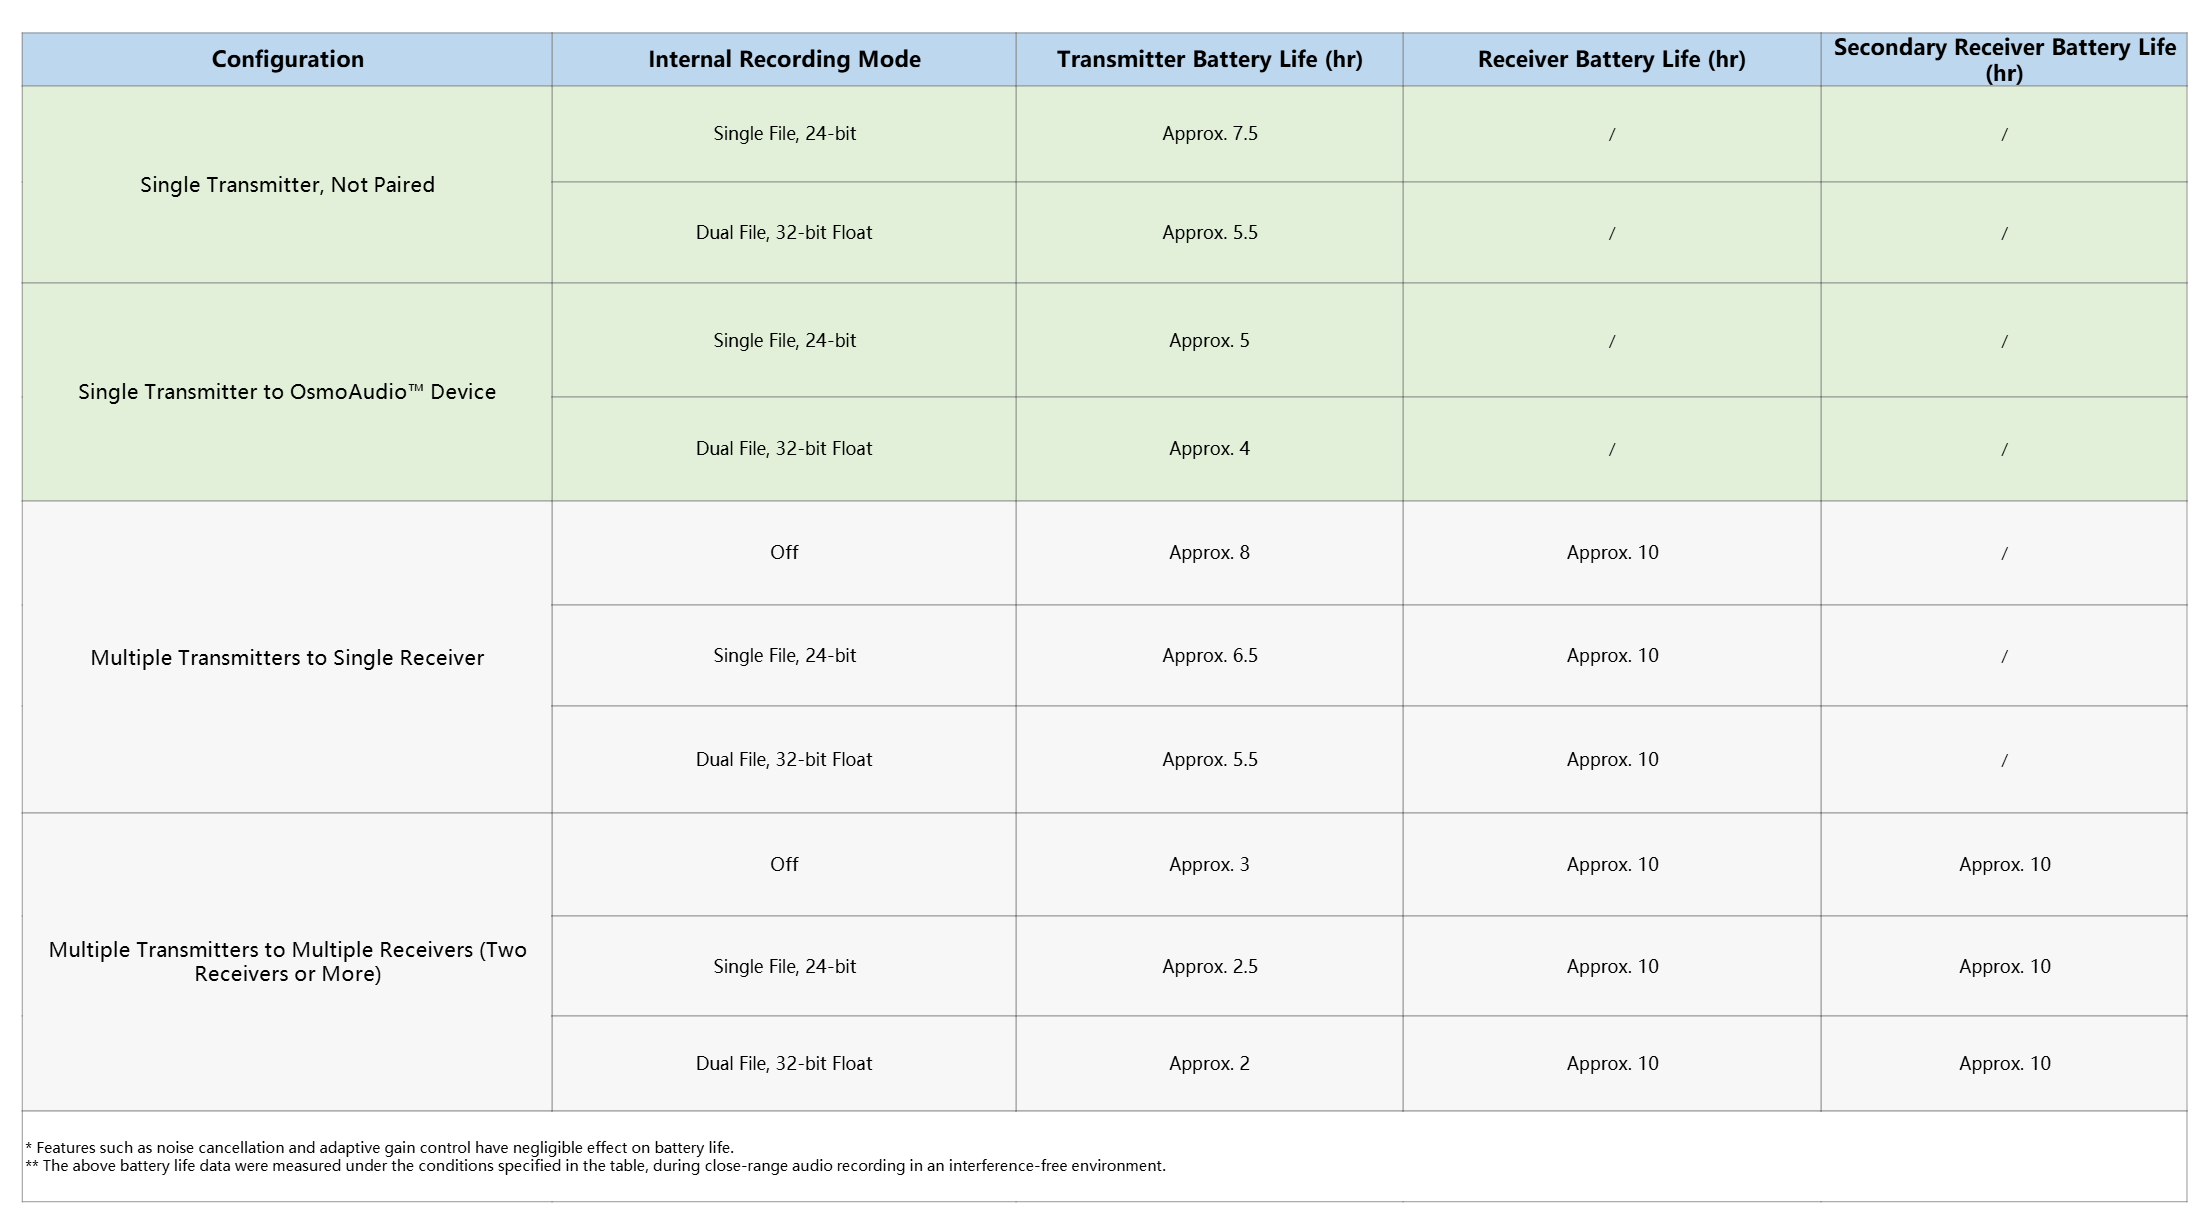
What is the battery life of the transmitter in different usage scenarios?
The battery life of the transmitter and receiver varies depending on the connection method and features that have a major impact on battery life. Refer to the table below for details.
Click to enlarge
Timecode
What are LTC and ATC in timecode? How do I use them?
Timecode is a system for marking time in audio and video content, allowing you to quickly synchronize files and improve production efficiency.
LTC (Linear Timecode) is commonly used for synchronizing devices that support timecode, such as cameras, recorders, and timecode generators.
ATC (Audio Timecode) is a method of embedding timecode into an audio track, typically used with cameras that do not natively support timecode.
To use timecode, check your camera or recorder's user manual to see which timecode formats are supported, and select the appropriate adapter cable if needed. Most popular non-linear editing software can read both LTC and ATC.
Why do I hear a regular buzzing sound in my footage after enabling timecode?
When ATC (Audio Timecode) output is enabled, the timecode information is recorded onto the left audio channel of your video. As a result, you may hear a regular buzzing sound when playing back the footage. Software like DaVinci Resolve can read timecode from the audio track to synchronize your clips automatically.
How is the timecode synchronized between the host receiver, secondary receivers, and transmitters?
Once the transmitters and receivers are connected to form a group, the host receiver automatically synchronizes timecode information with the transmitters and secondary receivers at regular intervals, without the need for manual user operation.
Does the transmitter support timecode input?
The transmitter automatically receives timecode from the receiver. It does not support synchronizing timecode from devices other than the receiver, nor does it support outputting timecode to other devices.
How to synchronize external timecode?
Each receiver can output timecode to cameras, recorders, and other equipment. Please select the appropriate adapter cable and output mode according to the device's port. For example, DJI Ronin 4D supports timecode input. You can connect the receiver to Ronin 4D's timecode port using a 3.5mm TRS to SDI adapter cable, set the receiver's timecode output type to L-OUT, and ensure that the device frame rates are matched to output timecode to Ronin 4D.
Only the host receiver supports external timecode input. After synchronization, the host receiver will automatically distribute the external timecode to the secondary receivers and transmitters. To synchronize external timecode, connect the host receiver's Output Port to the external timecode generator, switch to L-IN, and tap Sync. This will synchronize the external timecode to the receivers and transmitters. After synchronization, you can choose to disconnect from the external timecode generator or keep the connection. If you disconnect, DJI Mic 3 will continue to run its internal timecode independently. If you keep the connection, the host receiver will continuously receive external timecode and synchronize it with all receivers and transmitters in the network.
When disconnecting from the external timecode generator, please ensure that the disconnection icon appears on the receiver's screen to avoid synchronization errors when reconnecting the timecode generator.
How do I synchronize timecode to Osmo Pocket 3 or Osmo Action 5 Pro?
To synchronize timecode, enable the timecode function on DJI Mic 3 and set the receiver's timecode output type to L-OUT. Make sure all devices are set to the same frame rate. On Osmo Pocket 3 or Osmo Action 5 Pro, go to settings and scroll down to find the Timecode option. Then, connect the receiver to Osmo Pocket 3 or Osmo Action 5 Pro using the USB-C mobile phone adapter. The timecode will be synchronized automatically.
Will enabling timecode affect audio output?
DJI Mic 3 offers four timecode modes:
N/A: The receiver runs the timecode internally but does not output it externally.
L-IN: Used to synchronize timecode from an external timecode generator to the receiver.
L-OUT: The receiver outputs timecode externally in Linear Timecode (LTC) format.
A-OUT: The receiver outputs timecode externally in Audio Timecode (Audio-TC/ATC) format.
The impact of timecode on audio output varies depending on the selected timecode mode and channel mode. For details, please refer to the table below.
Click to enlarge

How accurate is the timecode of DJI Mic 3? What frame rates are supported?
The timecode drift of DJI Mic 3 is 0.5 ppm, which means a maximum deviation of 1 frame over 24 hours*.
DJI Mic 3 supports the following timecode frame rates: 23.98F, 24F, 25F, 29.97F, 29.97DF, 30F, 50F, and 60F.
* Measured using DJI Mic 3 (2 TX + 1 RX + Charging Case) in an environment free of electromagnetic interference, with continuous power supplied to the transmitters and receiver following timecode synchronization and throughout 24 hours of continuous recording.
DJI Mic 3 Accessories
What functions can be achieved when using DJI Mic 3 with the DJI Mic Series Camera Adapter?
The DJI Mic Series Camera Adapter lets you connect the DJI Mic 3 Receiver directly to a Sony camera's MI hot shoe, allowing for audio recording without the Camera Audio Cable (3.5mm TRS). It supports 48kHz 24-bit digital audio recording. Your Sony camera can also supply power to the DJI Mic 3 Receiver through the adapter.
After enabling the Auto On/Off With Camera in the receiver or DJI Mimo app, the receiver, when connected to the camera via the hot shoe, will automatically turn on when the camera is turned on and turn off when the camera is turned off.
Additionally, this adapter can solve the issue of electrical noise that may occur when certain Sony cameras (such as the A7S3, FX3, A6700, etc.) are connected to specific microphones using a 3.5mm cable.
What cameras are compatible with the DJI Mic Series Camera Adapter?
The DJI Mic Series Camera Adapter is only suitable for Sony cameras with an MI hot shoe. For a complete list of compatible devices, refer to the DJI Mic Series Camera Adapter Compatibility List available on the Downloads page of the official DJI Mic 3 webpage.
Can the DJI Mic Series Camera Adapter be used with DJI Mic, DJI Mic 2, or DJI Mic Mini?
The DJI Mic Series Camera Adapter is compatible with DJI Mic 3 and DJI Mic Mini, but not with DJI Mic or DJI Mic 2.
What is the difference between using the DJI Mic Series Camera Adapter and using the Camera Audio Cable (3.5mm TRS)?
The DJI Mic Series Camera Adapter enables digital audio recording and allows the camera to power the receiver, while the Camera Audio Cable (3.5mm TRS) supports analog audio recording. With either connection method, the receiver supports Auto On/Off With Camera.
What should I do if my camera shows an incompatibility message when using the DJI Mic Series Camera Adapter?
If your camera does not support digital audio signals, it will not recognize the DJI Mic Series Camera Adapter. For detailed compatibility information on Quadraphonic mode, refer to the Quadraphonic Computer Software Compatibility List available on the Downloads page of the official DJI Mic 3 website.
There's currently no reviews for this product, be the first to write one.


